Because of the many parameters involved in determining etching tolerances, it is impossible to give a definite, absolute rule to cover all circumstances. Some of the more common variables which affect the etching tolerances are: type of metal being etched, size of panel, equipment being used, and yield required. For purposes of establishing some general rules of thumb, a tolerance of +/- 15% of the metal thickness is usually acceptable. The two tables below give tolerances to be expected for varying metal thicknesses and flat sizes.
Table 1 – Prototype and Short Runs
This table is for prototype or short runs of parts with not more than one dimension per piece requiring the tolerance shown.
Flat Size |
Thickness (t, Inches) |
|||||||
| .001″ | .002″ | .005″ | .010″ | .015″ | .020″ | .040″ | ||
| 2″ x 2″ | Empirical | ±.0005″ | ±.0007″ | ±.0010″ | ±.0015″ | ±.0020″ | ±.0040″ | |
| 8″ x 10″ | Empirical | ±.0007″ | ±.0010″ | ±.0015″ | ±.0020″ | ±.0030″ | ±.0050″ | |
| 12″ x 18″ | Empirical | ±.0010″ | ±.0015″ | ±.0020″ | ±.0030″ | ±.0040″ | ±.0060″ | |
Table 2 – Production Runs:
This table reflects tolerances on full production runs.
Flat Size |
Thickness (t, Inches) |
|||||||
| .001″ | .002″ | .005″ | .010″ | .015″ | .020″ | .040″ | ||
| 2″ x 2″ | Empirical | ±.0010″ | ±.0010″ | ±.0015″ | ±.00120″ | ±.0030″ | ±.0050″ | |
| 8″ x 10″ | Empirical | ±.0010″ | ±.0015″ | ±.0020″ | ±.0025″ | ±.0040″ | ±.0060″ | |
| 12″ x 18″ | Empirical | ±.0015″ | ±.0020″ | ±.0025″ | ±.0035″ | ±.0045″ | ±.0070″ | |
Guidelines for Center-to-Center Dimensions
Generally, for small pieces, it is possible to etch photochemically machined parts which will tend to duplicate the center-to-center dimensions which exist on production artwork. Because of limitations in thee area of artwork preparation, the following table gives practical center-to-center dimension tolerances for finished parts.
Table 3 – Center-to-Center Dimensions
Inches |
Tolerances |
| 1″ or less | ±.0005″ |
| 1″-3″ | ±.0010″ |
| 3″-6″ | ±.0020″ |
| 6″-10″ | ±.0030″ |
Relationship of Hole Size and Slot Width to Metal Thickness
As a general rule, the diameter of a hole or the width of a slot cannot be less than 1.2 times the metal thickness. This relationship does vary as the metal thickness changes, as shown in the following chart.
Table 4 – Hole Size Tolerance
Thickness (T) |
Hole Size (D) |
Practical Tolerances Attainable |
| 0.0020″ | 0.0050″ | ±.0010″ |
| 0.0050″ | 0.0060″ | ±.0015″ |
| 0.0070″ | 0.0080″ | ±.0015″ |
| 0.0100″ | 0.0120″ | ±.0020″ |
| 0.0200″ | 0.0260″ | ±.0030″ |
Relationship of Line Width to Metal Thickness
Spacing between holes and slots generally presents no problem in chemical machining. However, when a part contains a large number of slots or holes, this spacing becomes a design factor. Again, the space between holes in this case is related to metal thickness. In metals less than .005″ thick, line widths must be at least the metal thickness. With metals over .005″ thick, line widths must be at least 1.2 times the metal thickness.
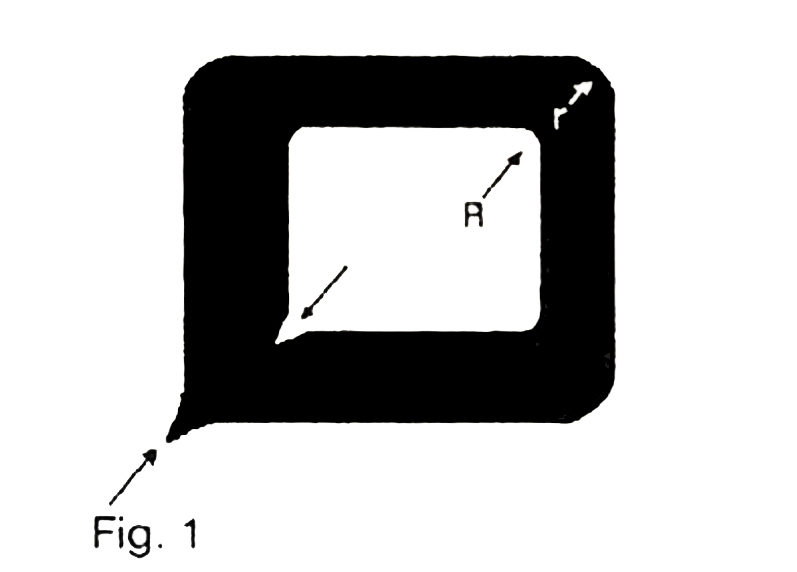
Relationship of Inside Corner Radius to Metal Thickness (Fig.1)
Figure 1
In general, the smallest inside corner (R) radius is directly proportional to the thickness of the metal, i.e., for metal thickness of .002″, inside corner radius would be .002″. Under certain circumstances, this radius can be made smaller.
Relationship of Outside Corner Radius to Metal Thickness (Fig.1)
Outside corners (r) tend to etch more sharply than inside: therefore, radii of less than metal thicknesses are obtainable. As a general rule, outside radii are considered to be at least .9 metal thickness.
Corner Radii (Fig.1)
The photochemical machining process tends to round off corner. This is sometimes advantageous because it keeps the part from causing scratches or cuts or from catching on other parts. However, if a square corner is desired, there are techniques available to obtain them. For example, Fig. 1 show how serifs can be added to the art work so that when the image is transferred it will reproduce as a sharp corner on the actual part.
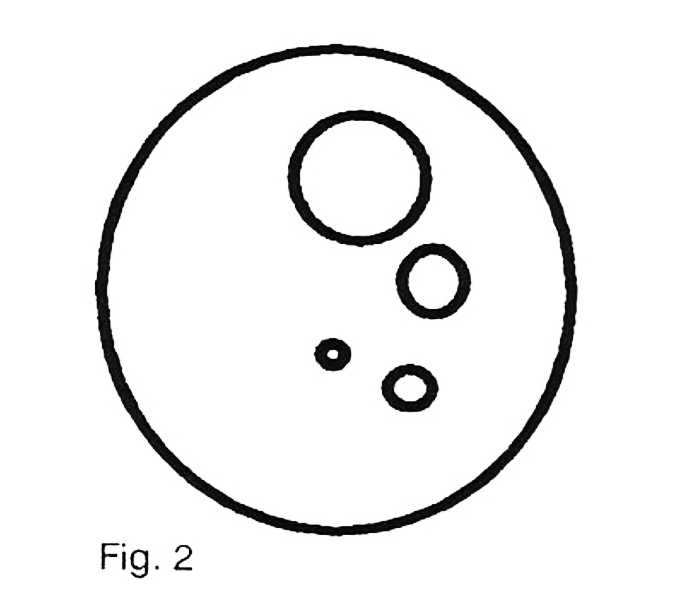
Hole Configurations (Fig. 2)
Figure 2
Where possible, keep hole configurations similar within a given piece, since different configurations tend to etch at different rates. Where different hole sizes are required, the problem can be solved by making sure that you use a common width etch band for making each hole configuration. Fig. 2 shows a variety of different sized holes, but utilizes the same width etch band. The etch band presents the same surface area to the etchant, and therefore etches more uniformly.
Relationship of Bevel to Metal Thickness
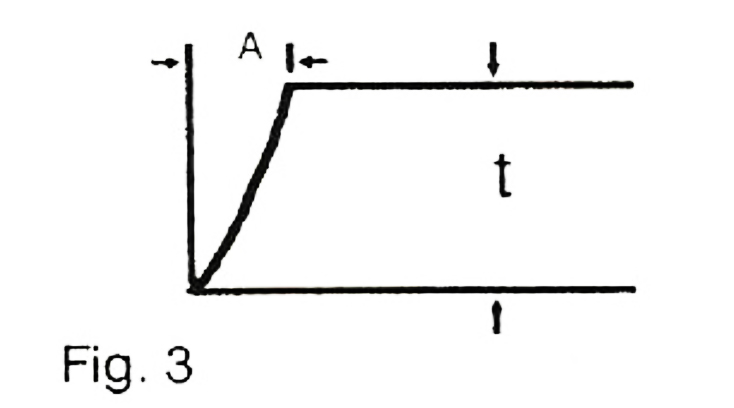
Etching One Side – (Fig. 3)
Figure 3
An etchant attacks the material laterally as well as vertically. The result, therefore, is the condition of etch configuration for a hole which is known a “bevel”. As a rule of thumb, for a material with a thickness t, the bevel A would be approximately 0.4t.
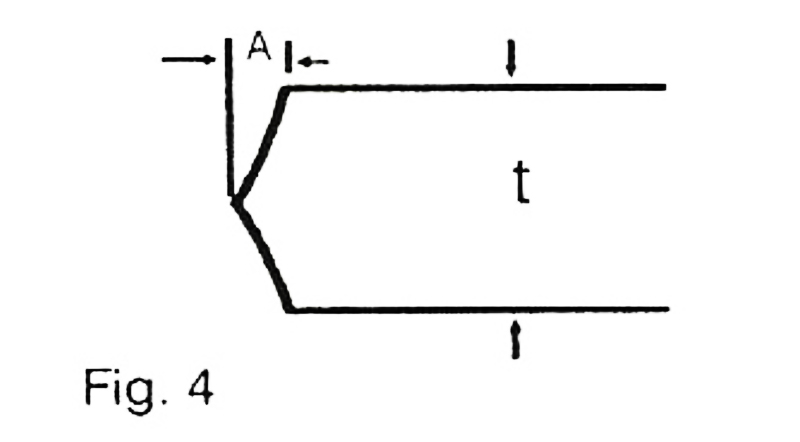
Etching Two Sides – (Fig. 4)
Figure 4
Assuming that the material is being etched equally from two sides, it can be easily seen that the bevel is appreciably reduced. As a general rule, when etching from two sides, the bevel A is approximately 0.2t.
Bevel (Fig. 5 and 6)
Figures 5 & 6
The etching process will produce some degree of slope to the wall of holes or to the metal edge. Generally, it is easier to etch equally from both sides or to etch entirely from one side. However, in a two-side etch the depth may be varied to produce more bevel on one side. However, in a two-side etch the depth may be varied to produce more bevel on one side.
Normally, this condition is referred to by the percentage of etch from either side; e.g., 90/10 would be etching 90% from one side, 10% from the other. When such a variation is required, it should be so specified. Inasmuch as this is a difficult operation, some latitude should be given as to percentage of etch from either side.
Tie-ins or Tabs
Tabbing is normally done by extending one or more lines from the part to the surrounding metal border. Unless specified, these tie-ins are normally made as few and as small as possible consistent with the size and quantity of parts being etched. Where parts are very small, tabs are beneficial when stripping photoresist or in plating operations. It may be cost effective to tab parts in panels.
